
This year the winter honey stores for many beekeepers in the Eastern Shore area was abysmal. At the November meeting, Dean Burroughs our local master beekeeper and MD state hive inspector said that across the board bees are starving and beekeepers need to address it and “Feed your Bees!”.
Personally, my first year hives were light, and my nucs from late summer had absolutely no stores. With all the problems getting hives to survive the winter months with Varroa, this, at least, is an issue that can be more easily addressed!!
As a first year beekeeper, I wasn’t 100% sure how to start.
While sugar syrup is great for spring and fall, it is not an option for the colder months.
Fondant is another option that can be used. I looked into this initially but the cost, especially for 4 hives, is high and having made it in the past I knew making it was time consuming and with a toddler in the house . . . nope!
The option I came across that seemed the perfect solution for me was making a candy board. When this was first suggested by another seasoned beekeeper the name made it sound involved, (totally picturing boiling hot sugar being being poured into molds) but a quick internet search showed that this method is straightforward, quick, and best of all generally only needs to be put on the hive once and then your done for the season! The candy board sits on top the hive in between the second deep and the covers. It acts as a food source and also as an insulator. Win, win!
So here is my personal experience making a candy board complete with instructions.
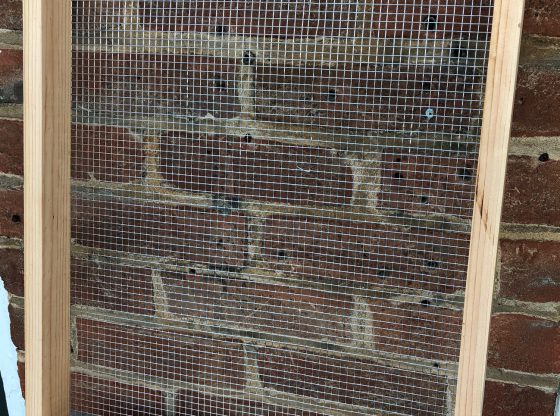
Create the frame:
This is the most time consuming part but since it can be used more than once it was worth making them. They can be bought online but are quite straight forward. My husband was a good sport and framed me up 4 in an afternoon.
Materials:
1X2 boards
1/2 inch Hardware Cloth
Screws
Staples


We have a 10 frame Langstroth hive and each frame took two end boards cut at 16.25 inches and the two middle boards cut at 17 inch boards. Our final frame measurements assembled was 20 inches by 16.25 inches.
Laying the frame on top of the hardware cloth a section was cut out measured to the outer edge of the frame. This goes on the inside with the wire coming up the edges on the inside so you want to have a little extra. Staple this to the inside. Done!
Candy:
16 pounds of sugar (yes you read that right!! I went to Sams and got 3 of the 25lb bags.)
3 cups of water
2 tbs of White vinegar to help prevent molding.

I weighed out the sugar and separated it into two very large bowel with 8 pounds in each.

I then mixed up the water and vinegar and slowly worked half of the amount into each of the sugars. Don’t pour it all in at once or it will get more soupy. I used my hands to really work
everything in as it was quicker than a spatula.
Take the frame and put it on a large cooking sheet or piece of cardboard lined with parchment paper.
Place a mason jar or some other container on the wire frame to keep an opening so the bees have access to the upper lid.


Pour the sugar mixture into the frame and press down firmly making sure it is well spread out and firm.
Leave in place for 24 -48 hours until it hardens and then place on hive!
Hoping this works!! I plan to open the hive to place it this upcoming week, treat one last time for varroa since my last mite count was high, and cross my fingers that they make it until spring!!